Scheduler operations
This example demonstrates how Lightworks can be used for interacting with the scheduling system.
[1]:
import lightworks as lw
from lightworks import remote

try:
    remote.token.load("main_token")
except remote.TokenError:
    print(
        "Token could not be automatically loaded, this will need to be "
        "manually configured."
    )
For testing, we’ll create and submit a very small job to the system and save the id of this job.
[2]:
sampler = lw.Sampler(
    lw.Unitary(lw.random_unitary(4)), lw.State([1, 0, 0, 0]), n_samples=100
)

qpu = remote.QPU("Artemis")
test_job = qpu.run(sampler, job_name="Test job")
test_job_id = test_job.job_id
Job management
There is a set of functions provided for managing jobs once they are submitted for the system. The majority of these can be completed directly using the created Job object when submitted (as demonstrated later), but if for some reason this no longer exists then the job ID may also be used. This can be seen when creating a job or may be retrieved from the dashboard.
First, we’ll use list_scheduled_jobs and show_scheduled to view all job IDs waiting for execution and the status of these jobs respectively. If you submitted the test job above recently then this should appear here. It may not have a queue position, depending on whether or not it has been allocated one yet.
[3]:
remote.list_scheduled_jobs()
[3]:
[17770]
[4]:
remote.show_scheduled()
[4]:
| Job ID | Status | Queue Position | |
|---|---|---|---|
| 0 | 17770 | Scheduled | 2 |
We can then view the different quantities about the test job, such as the job status, ID, queue position and any logging information.
[5]:
remote.get_job_status(test_job_id)
[5]:
'Scheduled'
[6]:
remote.get_job_details(test_job_id)
[6]:
ArtemisJobDetails(job_id=17770, queue_position=2, job_status=<Status.SCHEDULED: 'Scheduled'>, created_date='2025-10-16T08:25:47.928816Z', updated_date='2025-10-16T08:25:49.845111Z', logs=[{'message': 'Job received successfully', 'createdDate': '2025-10-16T08:25:47.928934Z', 'status': 'Accepted', 'meta': {}}, {'message': 'Job status updated to Scheduled', 'createdDate': '2025-10-16T08:25:49.800317Z', 'status': 'Scheduled', 'meta': {}}], notes=None)
It is also possible to cancel a job using the ID with cancel_job. This is skipped here as we’d like to view the results from the job.
[7]:
if False:
    remote.cancel_job(test_job_id)
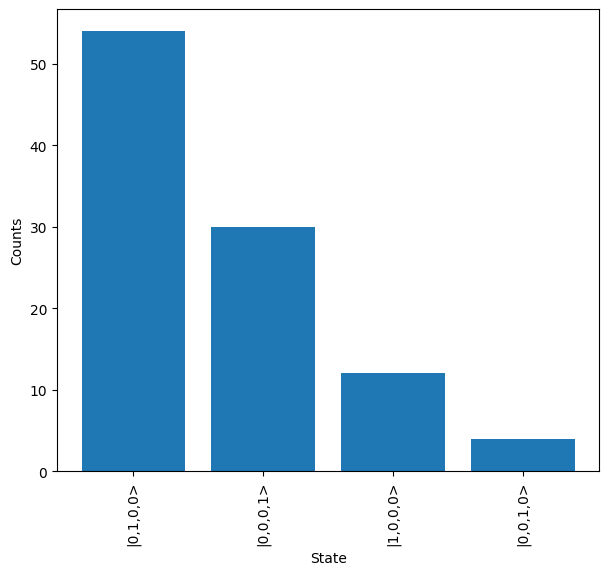
Finally, check_job_complete can be quickly used to check if a job is complete, or create a loop for waiting, and then the results can be downloaded with get_results. These are then plotted below.
[8]:
while not remote.check_job_complete(test_job_id):
    pass

results = remote.get_results(test_job_id)

results.plot()
QPU
For interacting with QPUs, we can first use list_qpus, to view the system that are available on the connected platform.
[9]:
remote.list_qpus()
[9]:
['Artemis']
A QPU can then be selected and more details about this system retrieved, allowing the suitability of a job on the system to be validated.
[10]:
remote.get_qpu_details("Artemis")
[10]:
ArtemisQPU(name='Artemis', id=1, n_modes=20, max_photon_input=8, max_detection_filter=4, default_max_samples=1000000, max_samples={1: 1000000, 2: 1000000, 3: 50000, 4: 10000}, available=True, last_updated='2025-10-16T08:26:21.96898Z')
Alternatively, a QPU backend can be created and the details viewed through this.
[11]:
qpu = remote.QPU("Artemis")

qpu.details
[11]:
ArtemisQPU(name='Artemis', id=1, n_modes=20, max_photon_input=8, max_detection_filter=4, default_max_samples=1000000, max_samples={1: 1000000, 2: 1000000, 3: 50000, 4: 10000}, available=True, last_updated='2025-10-16T08:26:21.96898Z')
These details can be viewed and utilised by accessing the attributes, for example below the status of the system is printed.
[12]:
print(f"Status: {qpu.details.available}")
Status: True
Job
Once a QPU backend is create and a job is then run against this, create a Job object which is intended for management of the job.
[13]:
job = qpu.run(sampler)
Various attributes are included for viewing the quantities of a particular job.
[14]:
print(f"ID: {job.job_id}")
print(f"Status: {job.status}")
print(f"Complete: {job.complete}")
print(f"Success: {job.success}")
print(f"Queue position: {job.queue_position}")
ID: 17771
Status: Scheduled
Complete: False
Success: False
Queue position: None
And a full set of details can be accessed through the details attribute.
[15]:
job.details
[15]:
ArtemisJobDetails(job_id=17771, queue_position=None, job_status=<Status.RUNNING: 'Running'>, created_date='2025-10-16T08:26:23.291578Z', updated_date='2025-10-16T08:26:24.441621Z', logs=[{'message': 'Job received successfully', 'createdDate': '2025-10-16T08:26:23.291705Z', 'status': 'Accepted', 'meta': {}}, {'message': 'Job status updated to Scheduled', 'createdDate': '2025-10-16T08:26:24.115197Z', 'status': 'Scheduled', 'meta': {}}, {'message': 'Job status updated to Running', 'createdDate': '2025-10-16T08:26:24.441551Z', 'status': 'Running', 'meta': {}}], notes=None)
It is also possible to view the exact payload which was submitted for the scheduling system. This is unlikely to be useful for regular operations but may be required for debugging the system.
[16]:
job.payload
[16]:
ArtemisPayload(qpu='Artemis', job_name='Job', lightworks_version='2.3.1', n_modes=4, input=lightworks.State(|1,0,0,0>), n_samples=100, min_detection=1, direct_implementation=False, unitary=array([[ 0.33464692+0.39627754j, -0.0875433 +0.15342565j,
        -0.24340263-0.005657j  ,  0.71471217+0.36011382j],
       [-0.67836579-0.12975142j,  0.37935145+0.37350074j,
         0.20661854+0.19734238j,  0.39044375+0.07411169j],
       [-0.07241614+0.09773986j, -0.32679932+0.59481738j,
         0.09139841-0.6489584j , -0.00667003-0.30830529j],
       [ 0.39468738+0.28876405j,  0.16162052+0.44571258j,
         0.55815044+0.34359183j, -0.29656093+0.13609064j]]), circuit_spec=None, job_data=None)
Once a job is submitted, wait_until_complete can be used to wait until results are ready and then these can be downloaded & plotted or processed as necessary.
[17]:
job.wait_until_complete()

results = job.get_result()
results.plot()

A retry method is also provided in case this is need for any reason. Here, we instantly use the cancel method to avoid re-computing the job.
[18]:
job.retry()
job.cancel()
Results
When results are returned from a job, these are stored as a dictionary-like Result object, where the keys are Lightworks States and the values are integer counts.
When a result is generated on Artemis, the raw data without any post-selection is provided. This post-selection is then applied by Lightworks. To view the post-selection criteria applied to a set of results, the corresponding attribute is accessed. In this case nothing is returned as no post-selection was used in the job.
[19]:
results.post_selection
If for some reason there is an issue with the data or post-selection it is also possible to view the raw unprocessed data using raw_data.
[20]:
results.raw_data
[20]:
{lightworks.State(|0,1,0,0>): 45,
 lightworks.State(|0,0,0,1>): 30,
 lightworks.State(|0,0,1,0>): 5,
 lightworks.State(|1,0,0,0>): 20}
The list of outputs associated with the processed data can also be viewed.
[21]:
results.outputs
[21]:
[lightworks.State(|0,1,0,0>),
 lightworks.State(|0,0,0,1>),
 lightworks.State(|0,0,1,0>),
 lightworks.State(|1,0,0,0>)]
And lastly, it is possible to save the processed or raw data using save as required.
[22]:
results.save("demo_results")
results.save("demo_results", raw_data=True)